Overview

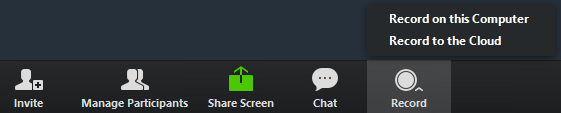
When you record a meeting and choose “Record to the Cloud“, the video, audio, and chat text are recorded in the Zoom cloud. The recording files can be downloaded to a computer or streamed from a browser. To manage your recorded meetings or share a recording with others, log in to your account and navigate to the My Recordings page.

Zoom also offers local recording, which saves the recording files to your computer.

Starting a Cloud Recording

Note: Only hosts and co-hosts can start a cloud recording. If you want a participant to start a recording, you can make them a co-host or use local recording.

To record a meeting to the cloud:

  1. Start a meeting as the host.
  2. Click the “Record” button in the Zoom toolbar.
  3. Select “Record to the Cloud” to begin recording.

  1. To stop recording, click “Pause/Stop Recording” or “End Meeting”.

Hosts will see the following recording indicator in the top-left corner while recording is active.

Participants will see the following indicator in the top-left corner while the recording is active.

Note: Dial-in participants will hear a message informing them that the meeting is now being recorded unless disabled by the host.

  1. Click “Participants” to see which users are currently recording.

Once the recording has been stopped, the recording must be processed before viewing. Zoom will send an email to the host’s email address when the process is completed.

Note:

Viewing Cloud Recordings

  1. Log in to the Zoom web portal and navigate to My Recordings.

Note: If your meeting has not finished converting, the recording will show in the list with a “Processing Recording” label. Once the recording has finished converting, you will be able to view, share, download or delete your cloud recording.

  1. Click the meeting topic to display the available file types of the recorded data, based on the settings you have enabled:
    • Shared screen with speaker view: MP4 file with audio and video showing both active speaker view and shared content.
    • Shared screen with gallery view: MP4 file with audio and video showing both gallery view and shared content.
    • Active Speaker: MP4 file with audio and video showing the active speaker view only.
    • Gallery View: MP4 file with audio and video showing the gallery view only.
    • Shared Screen: MP4 file with audio and video showing the shared screen only.
    • Audio only: M4A file with a recording of the audio.
    • Audio transcript: VTT file with a transcript of the audio only.
    • Chat file: Text file with the transcript of in-meeting chat.
  1. Click a file to play the recording or see the text of the chat. You can also download, share, or delete recordings.
  1. (Optional) If you want to trim the recording of a shared video so that it starts and ends at the times you specify, you can set a playback range. See Cloud Recording Playback for details.

Sharing Cloud Recording

Since cloud recordings are stored online, you can share a link and allow others to view your recording.

  1. Locate the meeting topic on the My Recordings page.
  2. Click “Share” in the last column of the recording you want to share.
  3. Click “Copy to Clipboard” to copy the public link.
  4. (Optional) You can change these settings to restrict access to your recording:
    • Share this meeting: Select Internally (account members only) to only allow account members to view or download the recording.
    • Viewers can download: Turn off the toggle if you do not want views to be able to download the recording.
    • On demand (registration required): Require visitors to fill out a registration form before viewing the recording.
    • Password protect: Require visitors to enter a password before viewing the recording.

Protecting Cloud Recordings

You can password protect the recording to limit who can download or view your cloud recording.

  1. Locate the meeting topic on the My Recordings page.
  2. Click “Share” next to the recording you want to password protect.
  3. Enable Password protect by clicking the toggle.
  4. Enter the password you want to use and click “Save”.